How to Survive a Nuclear Attack: The Ultimate Guide
What would you do to survive if nuclear war broke out tomorrow? You’re not alone if you’re worried as you scroll through your feed or watch the news. Experts say the risk of all-out nuclear war is unlikely, but knowing what to expect can give you peace of mind and keep you safe. Here are the facts: No one knows exactly what would happen in the case of a large-scale nuclear war.
However, you can still take steps to prepare for nuclear attacks on a smaller scale.In this step-by-step guide, we’ll cover everything you need to know to prepare and survive—in the days, hours, minutes, and seconds before and after a nuclear attack.
In this blog post, I'll discuss everything from the basics of nuclear warfare, how to build your own underground shelter to more advanced topics like radiation poisoning. So whether you're just curious about nuclear warfare or you want to be prepared should it ever happen, this blog post is for you!
Let's start with the basics.
What is nuclear warfare?
Nuclear warfare refers to the use of nuclear weapons in combat. Nuclear weapons are the most destructive weapons ever created, and their use can result in catastrophic consequences, including massive loss of life, widespread destruction, and long-lasting environmental damage.
The history of nuclear warfare dates back to World War II when the United States used nuclear weapons against Japan. Since then, there have been numerous close calls and tensions between nations with nuclear weapons. Currently, the world is facing a rising threat of nuclear warfare due to ongoing conflicts and nuclear weapons testing.
The potential consequences of a nuclear war are severe and far-reaching. The immediate impact would be the loss of life and infrastructure damage caused by the nuclear explosions. The radiation released from these explosions would also have long-term effects on the environment and human health, causing cancer, genetic mutations, and other health problems. Additionally, the global economy would be severely impacted, and it could take decades for countries to recover from a nuclear war.
Remember you can always search for open shelters by texting SHELTER and a ZIP code to 43362. Example: Shelter 01234 (standard rates apply).
These weapons are capable of causing immense destruction and loss of life, making them some of the most powerful weapons in the world. In a nuclear attack, a nuclear bomb is detonated either in the air or on the ground, resulting in a devastating explosion.
Will you get a warning if a nuclear attack is underway?
The answer is maybe...
If you're ever faced with a nuclear attack, your first priority should be to seek shelter. You will generally only have about 5 minutes to get to safety.
This means finding a place where you can take cover and protect yourself from the blast and radiation. The best place to seek shelter is an underground area, such as a basement or tunnel.
Step 1. Seek shelter immediately.
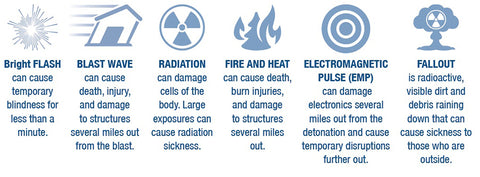
According to the U.S. Department of Homeland Security, the first warnings of an imminent nuclear attack will likely be an alarm or warning signal, or in the absence of a warning, the blast itself. The bright light from a detonation of a nuclear weapon can be seen tens of miles away from ground zero. Surviving the blast is almost impossible if you are in the vicinity of ground zero, unless you are in a shelter that provides excellent blast protection. Even if you are a few miles out, you will only have about 10-15 seconds until the heat wave hits you, followed by the shock wave in 20-30 seconds. It is crucial not to look directly at the fireball, as this can cause temporary blindness at large distances on a clear day. The actual damage radius is highly variable, depending on the size of the bomb, the altitude of the explosion, and even the weather conditions at the time of the blast.
For more information on preparing for a nuclear attack, the U.S. Department of Homeland Security offers helpful tips on their website: https://www.ready.gov/nuclear-blast.
If you can't find shelter, seek a depressed area nearby and lay face down, exposing as little skin as possible. If there is no shelter of this kind,dig as fast as possible. Even around 8 kilometers (5 miles) you will suffer third degree thermal-burns; still at 32 kilometers (20 miles) the heat can burn the skin off your body. The wind itself will peak at around 960 kilometers per hour (600mph) and will level anything or anybody caught in the open.
Failing the above options, get indoors, if, and only if, you can be sure that the building will not suffer significant blast and heat damage. This will, at least, provide some protection against radiation. Whether this will be a viable option depends on the construction of the building and how close you will be to the likely ground zero of a nuclear strike. Stay well away from any windows, preferably in a room without one; even if the building does not suffer substantial damage, a nuclear explosion will blow out windows at enormous distances. For an example, one (albeit abnormally large) nuclear test in the Novaya Zemlya archipelago in Russia was known to knock out windows in Finland and Sweden.
If residing in Switzerland or Finland, check if your home has anatomic shelter. If not, determine where your village/town/district atomic shelter is and know how to get there. Remember: anywhere in Switzerland, you'll be able to find an atomic shelter. When the sirens sound in Switzerland, you are advised to inform those who may not be able to hear it (e.g. thedeaf) and then listen to the National Radio Services (RSR, DRS and/or RTSI).
Don't be surrounded by anything flammable or combustible. Substances like nylon or any oil based material will ignite from the heat.
2. Remember that radiation exposure could cause large numbers of deaths.
Initial (prompt) radiation. This is radiation released at the moment of detonation, and it is short-lived and travels short distances. With the large yields of modern nuclear weapons, it is thought that this will kill few who would not be killed by the blast or heat at the same distance.
Residual radiation. Known as radiation fallout. If the detonation was a surface blast or the bomb hits the earth, large amounts of fallout are produced. The dust and debris kicked into the atmosphere rains down, bringing with it dangerous amounts of radiation. The fallout may rain down as contaminated black soot known as "black rain," which is very fatal and may be of extreme temperature.
Fallout will contaminate anything it touches.
Once you have survived the blast and the initial radiation (for now at least; radiation symptoms have an incubation period), you must find protection against fallout.
3. Know the three different types of radiation:
Alpha particles. These consist of 2 protons and 2 neutrons (a helium nucleus) ejected at high speed from the nucleus of a decaying atom. Alpha particles are stopped by the outer layer of your skin or a few centimeters of air. They present a minimal threat outside your body. However, alpha-emitting materials can do serious damage if ingested or inhaled.
Beta particles: These consist of a high-speed electron, again ejected from the nucleus of a decaying atom. They are more penetrating than alpha particles and may cause "Beta burns" if materials are in direct contact with the skin for prolonged periods of time. These burns are similar tosunburn.
Gamma rays: Gamma rays are the most penetrating of the three main types of radiation. They will penetrate any kind of clothing and requires large masses of materials for shielding. Therefore gamma radiation will cause severe damage to the body even when outside the body.
A shelter's PF against radiation will tell you how many times less a person inside the shelter will receive radiation compared to open space. For example, PF 300 means that you will receive 300 times less radiation in the shelter than in the open.
Avoid exposure to Gamma radiation. Try not to spend more than 5 minutes exposed.
4. Begin reinforcing your shelter from the inside by stacking dirt around the walls or anything else you can find.
As a survival expert, it's crucial to know how to protect yourself from radiation in case of a disaster. One effective method is to reinforce your shelter from the inside by stacking materials like dirt or anything else you can find around the walls.
If you're in a trench, it's essential to create a roof, but only if materials are nearby. To prevent fallout debris from piling on you, use canvas from a parachute or tent. However, it's impossible to completely shield yourself from all radiation; it can only be reduced to a tolerable level. To determine the amount of material you need to reduce radiation penetration to 1/1000, use the following measurements: Steel: 21 cm (0.7 feet), Rock: 70-100 cm (2-3 ft), Concrete: 66 cm (2.2 ft), Wood: 2.6 m (8.8 ft), Soil: 1 m (3.3 ft), Ice: 2 m (6.6 ft), Snow: 6 m (20-22 ft). So, be prepared and take the necessary steps to protect yourself from radiation.
Steel: 21 cm (0.7 feet)
Rock: 70-100 cm (2-3 ft)
Concrete: 66 cm (2.2 ft)
Wood: 2.6 m (8.8 ft)
Soil: 1 m (3.3 ft)
Ice: 2 m (6.6 ft)
Snow: 6 m (20-22 ft)
If you don't have access to an underground area, try to find a sturdy building and get as close to the center of it as possible.
5. Plan on staying in your shelter for a minimum of 48 hours (2 days).
Under no circumstances leave the shelter in the first forty-eight hours.
The reason for this is to avoid the "fission products" created by a nuclear blast.
The other major products of nuclear fission are Cesium and Strontium. These have longer half lives of 30 years and 28 years respectively. They also are very well absorbed by living things and can make food products dangerous for decades. These materials can be carried by the wind thousands of miles, so if think you are safe in a remote area, you are not.
How to Build an Underground Nuclear Bunker/ DIY Bomb Shelter Plans
In the event of a nuclear war, it is imperative that you have a fallout shelter and nuclear attack survival kit with Potassium Iodine (but we'll talk about the kit later.)
A nuke shelter will protect you from the radiation and fallout that would otherwise kill you.
In this guide, we will teach you how to make your own nuke shelter using materials that are readily available.
We will also discuss some of the best locations for your shelter, and how to prepare for a nuclear attack.
First lets talk about planning, you have to have a plan of action before you go ahead and blindly build yourself a bunker. We recommend using some type of planning software or blueprint to be sure your end result is what your envisioning.
Building an underground bunker from scratch requires a lot of planning and preparation. In this article, we will discuss the supplies that you need to buy to build an underground bunker from the ground up.
Concrete: Concrete is the primary material used to construct the walls and floor of the bunker. You will need to purchase a large amount of concrete to create a sturdy and durable structure. You can purchase concrete in bags, or you can hire a concrete truck to deliver the concrete to your location.
Rebar: Reinforcing steel bars, also known as rebar, are used to strengthen the concrete walls and floor. The rebar should be laid out in a grid pattern to ensure maximum strength and stability.
Cinder Blocks: Cinder blocks are another option for constructing the walls of the bunker. They are easy to work with, cost-effective, and provide excellent protection against the elements.
Plywood: Plywood is used to create the formwork for the concrete walls and floor. It is also used to create the door and window frames.
Waterproofing Sealant: A waterproofing sealant is necessary to prevent water from seeping through the concrete walls and floor. You can use a liquid rubber waterproofing sealant or a bitumen-based waterproofing sealant.
LED Lights: LED lights are energy-efficient and provide bright illumination inside the bunker. You can purchase LED lights that are specifically designed for underground use.
Long-Term Food Storage: In case of an emergency, you will need a supply of food to sustain you and your family for an extended period. Consider purchasing long-term food storage options such as freeze-dried meals or canned goods.
Table and Chairs: A table and chairs provide a place to eat and work inside the bunker. Consider purchasing a table and chairs that are foldable and easy to store.
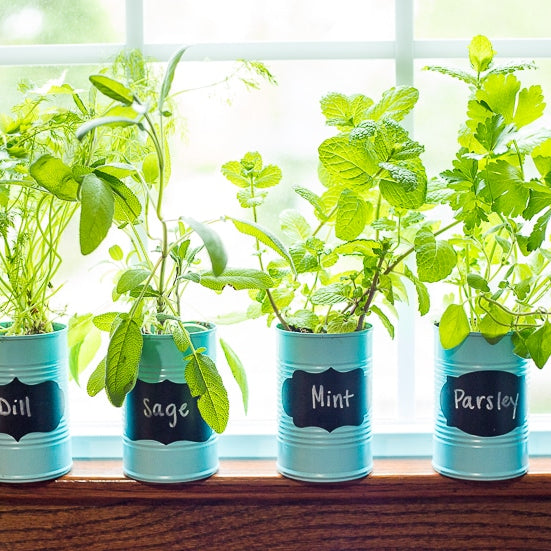
Plants: Plants are not only aesthetically pleasing, but they also provide a source of fresh air and can help purify the air inside the bunker. Consider purchasing plants that thrive in low-light conditions.
Bulletproof Glass: Bulletproof glass is necessary to protect against potential intruders. Consider purchasing bulletproof glass that can withstand a high caliber bullet.
Steel Door: The door to the bunker is one of the most critical components. It needs to be sturdy and secure to prevent unauthorized access. Consider purchasing a steel door with a multi-point locking system.
Steel Shutters: Steel shutters provide an additional layer of protection against intruders and the elements. Consider purchasing steel shutters that are easy to operate and can be locked from the inside.
Sandbags: Sandbags are used to provide additional protection against flooding or water intrusion. Consider purchasing sandbags and storing them in the bunker in case of an emergency.
Measuring Tape: A measuring tape is essential for taking accurate measurements when constructing the bunker.
Saw, Nails & Screws, Level: These tools are necessary for cutting and assembling the plywood formwork, installing the door and window frames, and ensuring everything is level.
Building an underground bunker from the ground up is a significant undertaking, but it can provide peace of mind in case of an emergency. By using the supplies listed above, you can create a safe and secure shelter that will protect you and your family from the elements and potential threats. Remember to plan carefully, take accurate measurements, and use high-quality materials to ensure maximum protection.
To make things easier for you, we've researched and hand-picked some of the top-rated Amazon products that meet these requirements. For example, the SAKRETE of North America 110160 Concrete Mix is an excellent option for building your bunker's walls and foundation.
For the walls and roof of your shelter, you will need thick concrete or bricks. You will also need plenty of sandbags, cinderblocks, or other sturdy material to create a fallout shelter.
In addition, you will need a way to seal off the entrance to your shelter. This can be done with a heavy door, metal sheeting, or another sturdy material.
Once you have gathered all of the materials, it is time to figure out where you're going to put your shelter.
Decide the best place to put a bomb shelter on your property
When considering where to place a bomb shelter on your property, it's important to take into account various factors to ensure the shelter's effectiveness.
Distance from flood zones: A bomb shelter should be placed far away from flood-prone areas to avoid potential damage from flooding or water accumulation. FEMA recommends considering the property's elevation, soil type, and other factors that may impact the shelter's stability during floods.
Elevation: If you live in an area prone to flash flooding, consider placing the shelter high up on a hill or mountain to avoid potential water damage. The shelter's location should also be elevated enough to avoid groundwater infiltration, which can compromise the shelter's structural integrity.
Remote location: A bomb shelter should be placed in a remote location away from populated areas to minimize the risk of exposure to nuclear radiation or other hazards. However, it should be close enough that you can reach it within five minutes in case of an emergency.
Access to water: Access to a water source is crucial in case you need to purify water. FEMA recommends locating the shelter close to a natural water source, such as a well, a stream, or a pond, but far enough away from it to avoid potential contamination.
By considering these factors, you can choose the best location for a bomb shelter on your property, which will provide you and your family with a greater chance of survival in case of a catastrophic event.
How to Build A Nuclear Fallout Shelter
Pouring a foundation is a critical step in building an underground shelter. The foundation provides the structural support for the shelter and helps to prevent water from seeping into the shelter. Here are the steps for pouring a foundation for an underground shelter:
Your Foundation
Once you've chosen the perfect spot for your bunker, it's time to start digging! If you're planning on building a large bunker, it's best to hire a professional excavator. However, if you're only looking to build a small emergency shelter, you can probably do the digging yourself.
Step 1: Excavate the Site
The first step in pouring a foundation is to excavate the site. This involves removing the topsoil and any other debris from the area where the shelter will be built. The excavation should be done to a depth of at least four feet, and the walls of the excavation should be sloped at a 45-degree angle to prevent collapse.
It is important to remove all rocks, roots, and other obstructions from the excavation site to ensure a level surface for the foundation. A bobcat or other excavation equipment can be used for this step.
When you're excavating, be sure to dig down at least six feet (two meters), in order to ensure that your bunker is well-protected from the elements.
It's also a good idea to build your bunker entrance on the side of a hill so that it's less likely to be detected.
The dimensions of your bunker should be based on how many people you want to be able to shelter in it. A good rule of thumb is to have at least 100 square feet (nine square meters) per person.
A common dimension of bunkers is eight feet by ten feet (two and a half meters by three meters). This size will comfortably fit four people and all of their supplies.
If this isn't your forte you can hire a professional to build it for you or try your hand at doing it yourself.
Just a side note:
Remember, you should try not to reveal what you are building, in an emergency situation you don't want people knowing that you have these types of things.
It will make you more susceptible to looting or even attract people who have not taken the time to prep.
This is not a good scenario, especially if you've carefully planned how many days of food rations you've stockpiled. It's an unfortunate situation for them but prepping is about the survival of the fittest and you have to remember that you and your family are priority.
Step 2: Build the Formwork
The next step is to build the formwork for the foundation. The formwork is a temporary structure that holds the concrete in place until it dries. The formwork should be built to the desired size and shape of the foundation, and should be reinforced with rebar to prevent collapse.
It is important to make sure the formwork is level and square to ensure a uniform foundation. The formwork can be made from plywood or other materials, and should be secured with stakes or other supports.
Building the walls of your bunker is next on the agenda. If you're using cinder blocks, it's important to use mortar in between each block to create a water-tight seal.
The walls should be at least six inches (15 centimeters) thick, in order to provide adequate protection from the outside world.
If you're worried about radiation exposure, you can line the walls of your bunker with lead sheets. This will help to protect you from any harmful radiation that might seep into your shelter.
Step 3: Pour the Concrete
Once the formwork is in place, the next step is to pour the concrete. A concrete mixer or truck can be used for this step, or the concrete can be mixed on-site. The concrete should be poured in sections, starting at one end of the formwork and working toward the other end.
It is important to make sure the concrete is level and free from air pockets to ensure a strong foundation. The concrete should be smoothed and finished with a trowel or other finishing tool.
Amazon.com has a variety of concrete mixers, trowels, and finishing tools that can be used for pouring a foundation. Here are a few recommendations:
The Kraft Tool CC162 Concrete Walking Edger is a finishing tool that can be used to smooth and finish the edges of the foundation.
By following these steps and using the proper tools and equipment, you can pour a strong and durable foundation for your underground shelter.
Once your walls are built, it's time to start working on the roof.
One of the most important aspects of bunker construction is making sure that your roof is strong enough to withstand the weight of several feet of dirt and debris.
The roof should be made out of reinforced concrete* and should be at least two feet (60 centimeters) thick.
*Reinforced concrete is concrete in which metal mesh or rods have been inserted to strengthen the material.
The roof material should also be fireproof, in case of a wildfire. To fireproof the roof, you can use a fire-resistant spray or apply a layer of vermiculite.
If you're building an underground fallout shelter, you'll also need to install a ventilation system to ensure that the air inside is clean and breathable.
Step 4. Install Your Doors and Windows
The next step is to install the doors and windows of your bunker.
The doors should be made out of solid wood or metal and should be at least two inches (five centimeters) thick. The door should also be equipped with several deadbolt locks. The deadbolts should be large and heavy enough that they can't be broken down or cut through by looters.
If you're building an underground bunker or shelter, one of the most important features is a secure entrance. A vault door can provide the security and peace of mind that you need to feel safe in your shelter. Here's a step-by-step guide to help you install a vault door to your underground bunker.
Choose the Right Door
Before you begin the installation process, you'll need to choose a vault door that's appropriate for your shelter. Look for a door that's made from sturdy materials like steel and has a solid locking mechanism. You should also consider the size of the door and ensure that it will fit the opening of your shelter.
Prepare the Opening
Once you have your door, you'll need to prepare the opening for installation. The opening should be slightly larger than the door to allow for a snug fit. Use a hammer and chisel to remove any excess concrete or debris from the opening.
Install the Door Frame
The next step is to install the door frame. This frame will provide support for the door and ensure that it fits snugly in the opening. Use anchor bolts to secure the frame to the concrete walls of your bunker.
Install the Door
Once the frame is in place, you can install the door itself. This is a two-person job, so enlist the help of a friend or family member. Carefully lift the door into place and slide it into the frame. Make sure that the door is level and centered in the opening.
Secure the Door
With the door in place, it's time to secure it. Use the locking mechanism that comes with the door to lock it securely in place. You may also want to consider adding additional security measures like deadbolts or electronic locks.
Test the Door
Finally, it's important to test the door to ensure that it's functioning properly. Check the locking mechanism to make sure that it's working as it should. You should also check the seal around the door to make sure that it's airtight.
By following these steps, you can install a vault door to your underground bunker and enjoy the peace of mind that comes with having a secure and safe shelter.
If you opt for windows they should be made out of bullet-proof glass and should be large enough to provide adequate ventilation.
Bulletproof glass can be purchased at most hardware stores or ordered online, just be sure you measure twice and order once! I say this because the cost for bullet proof glass can range from $25 to $100 per square foot, so it's definitely not cheap.
The windows should also be equipped with metal shutters, this will protect you from flying debris. The shutters should be at least 3" thick and should be mounted on heavy duty hinges that won't buckle under pressure.
You might also want to install a peephole in the door so that you can see who is outside before opening the door. If you are installing a peep hole be sure to use bullet proof glass and seal it. A peep hole might not be necessary if you have a surveillance system though.
Surveillance Systems
When it comes to building an underground shelter, safety and security are top priorities. One important aspect of security is having a surveillance system in place. A good surveillance system will help you monitor the surroundings of your shelter and alert you to any potential threats. Here are some top-rated surveillance systems that can be incorporated into your underground shelter:
Security Cameras
Security cameras are a popular and effective way to monitor your shelter and its surroundings. You can install cameras inside and outside your shelter to keep an eye on your property, and you can view the footage remotely from a smartphone or computer.
Some top-rated security cameras on Amazon include the Arlo Pro 4 Wireless Security Camera, the Nest Cam IQ Outdoor Security Camera, and the Wyze Cam v3. These cameras are easy to install and provide high-quality video footage.
Motion sensors are another useful addition to a surveillance system. They can detect movement in the vicinity of your shelter and alert you to potential intruders. You can install motion sensors on the exterior of your shelter to create a perimeter alarm system.
Amazon offers a variety of motion sensors, including the Kangaroo Motion and Entry Sensor, the Ring Alarm Motion Detector, and the Honeywell Home SiXPIR Motion Detector. These sensors can be easily installed and integrated with your surveillance system.
Door and Window Alarms
Door and window alarms are a simple yet effective way to secure the entry points of your underground shelter. These alarms can be triggered when a door or window is opened, and they can alert you to potential intruders.
Some recommended door and window alarms on Amazon include the GE Personal Security Window/Door Alarm, the Sabre Wireless Door and Window Alarm, and the SimpliSafe Entry Sensor. These alarms can be installed quickly and easily, and they provide an added layer of security to your shelter.
When installing your surveillance system, it's important to follow the manufacturer's instructions carefully to ensure proper installation and operation. You should also test the system periodically to make sure it is functioning properly.
By incorporating a surveillance system into your underground shelter, you can increase your sense of security and peace of mind. With a wide range of surveillance products available on Amazon, it's easy to find the right system to suit your needs and budget.
Surveillance systems or cameras will help to deter any potential intruders and alert you if there are any looters prowling on your property.
You want your bomb shelter to be impossible to break into from the outside, spend the extra money, secure your shelter.
Looters will be especially motivated if they are starving, sick, and desperate.
Step 5. Waterproof Your Bunker
Now that the exterior of your bunker is complete, it's time to start working on the interior.
The first thing you'll need to do is waterproof the walls and floor. You can do this by painting the walls and floor with a waterproof sealant such as Liquid Rubber. You'll want to do this the same way you would seal a basement - using a roller and by making sure you get a thick even coat.
A good waterproof sealant is important because it will help to keep the interior of your bunker dry and mold-free.
I suggest using a sealant that is specifically designed for basements or waterproofing concrete.
You'll want to seal the walls, floor, and ceiling, don't slack off - this is an important step!
This will help to keep the interior of your bunker cool in the summer and warm in the winter.
You can purchase insulation at most hardware stores or online.
I suggest using fiberglass insulation, as it is easy to install and is relatively inexpensive. The insulation should go on the walls, floor, and ceiling.
Insulation costs about $0.50 per square foot.
Step 7. Heating and Cooling
After you've added insulation, you may want to add some kind of heating and cooling system depending on where you live.
Click picture for details on the Solo Stove.
There are a few different options when it comes to heating and cooling, so you'll need to decide what's best for your needs.
To heat your bunker and cook food the best bet is to use butane or marine alcohol.
Butane gives you higher BTUs, but alcohol is more easily found at a number of local stores and can potentially be produced locally from a number of different organic materials.
It is worth noting that in a power outage, a below-ground basement would maintain a livable temperature between 50 and 60 degrees, summer or winter only differing slightly based on your location. (United States)
These two options are the most efficient and will produce very little smoke. If you want to use a wood-burning stove, make sure that it is properly vented to the outside.
Many survivalists disagree with using a wood burning stove because of the risks associated with carbon monoxide, so it's important to do your research and make an informed decision.
That is why we recommend survival food buckets that do not require cooking or heating. You can obtain the same nutrients from freeze dried meat as you can from cooking it.
As for cooling, you can use a swamp cooler or an air conditioner. A swamp cooler is the most energy-efficient option, but it requires a lot of water.
It's important to have at least a three-month supply of food and water, you'll need to calculate how much food and water you'll need to survive and for how long. To do this you need to know the number of people and what their daily caloric intake is.
To power the bunker you will need to find a power source.
One way is with a generator. Generators can be used to provide electricity for lights, cooking, and other essential needs. I highly recommend using a solar powered generator, you won't have access to gasoline in your bunker, check out this solar generator on Amazon.
Another way to power a bunker is with solar panels. Solar panels can be used to generate electricity, which can then be stored in batteries. Solar panels can also be used to heat water, which is an important consideration in a bunker.
Finally, you might also consider using a wind turbine to generate electricity for your bunker. Wind turbines can be used to generate electricity, which can then be stored in batteries.
And don't forget the toilet! A small camping toilet will do the trick or sealed toilet bucket. Many people don't know but you can use earth worms to turn over human waste. Worth looking into.
You might also want to include some entertainment in your bunkers, such as books, games, and movies. After all, you might be spending a lot of time down there.
You will also need to stock up on medical supplies and other essential items.
Finally, it is important to remember that a nuclear shelter is only as good as its location.
Likely Nuclear Targets in the United States.
Blue Zones = Most Safe Red Zones = Least Safe
The most safe areas in the US in a nuclear war include the upper Midwest, Maine, West Texas, and multiple small pockets, usually in areas that don’t have large populations. The most unsafe areas include most of the East Coast and anywhere near a major city, a key infrastructure location, or military installation.
The best locations for a fallout shelter are near mountains or other natural barriers.
The U.S. cities most likely to be the biggest nuclear targets include New York, NY; Washington D.C.; Dallas-Fort Worth; and Jacksonville, FL. These cities could be potential targets due to their large populations and strategic value.
Although these are the most likely high-priority targets, any significant population center could potentially come under attack. FEMA and the National Resources Defense Council actuallypublished a map in 1990showing potential nuclear targets.
Other major cities that could become targets for a nuclear attack include:
Miami, FL
Los Angeles, CA
San Francisco, CA
Philadelphia, PA
Pittsburgh, PA
Chicago, IL
Houston, TX
Phoenix, AZ
Honolulu, HI
It is important to note that you should be sure to avoid areas that are near densely populated cities or government buildings that might be targeted, this includes air force and military bases, and even famous monuments that symbolize America.
Unfortunately these are places that would hypothetically (if we take a look a history) would be targeted first.
The map and the targets listed are discussed inthis articlepublished by Independent in 2017.
In conclusion,
If you follow these steps, you will be able to build your own nuke shelter and survive a nuclear attack.
How to Survive a Nuclear Bomb
If you're caught outside during a nuclear attack, try to find something to cover yourself with. This can be anything from a piece of clothing to a door or piece of furniture.
Once you've found something to cover yourself with, get down on the ground and stay as low as possible.
One of the biggest dangers of nuclear warfare is radiation poisoning. This occurs when you're exposed to radiation from a nuclear bomb or explosion.
Symptoms of radiation poisoning can include nausea, vomiting, diarrhea, hair loss, and skin burns.
If you're exposed to radiation, it's important to get rid of any contaminated clothing and wash your body as soon as possible. Scrub your entire body thoroughly and dispose of your clothes. Remember, everything that is exposed to fallout dust is going to be contaminated.
This includes your food such as outdoor crops, gardens, or any other food not covered outdoors.
It also includes your water supply as well, any outdoor streams, open wells, or bodies of water will be absolutely hazardous to your health.
That is why I cannot stress enough to buy food buckets and water bricks! This will seal off your food and drink supply from contamination!
It is absolutely crucial to have access to clean drinking water, you can buy a radiation removal filter that can eliminate up to 99.99% of radioactive materials. This is a must have for any bunker or survival scenario.
Prepping is about be prepared for anything, even if it may be unlikely.
How far underground would you have to be to survive a nuclear blast?
Packed earth insulates against radiation and blast waves, but don't go deeper than10 feet; because if your exits (make two) become blocked in the blast, you may need to dig yourself out.
However, if you are confident in the foundation of your bunker the further underground th better.
The unfortunate truth is that if you are within a few miles of the blast site, you will likely die from the initial explosion if you are not in your bunker.
If you are within a few miles of the blast site and survive and were not in your bunker, you will likely die from radiation poisoning.
To ensure that you survive a nuclear blast, you need to be as far away from the blast site as possible and have a fall out shelter.
I highly recommend investing in a police scanner so that you can be aware of what's happening around you.
The United States does have an early warning system in place but this will only give you a few minutes to seek shelter before impact.
How long do you have to stay underground after a nuclear bomb?
PLAN FORTWO WEEKSUNDERGROUND
It can be hard to gauge when it's safe to emerge from your shelter, but most estimates suggest a minimum stay of 24-hours, and a maximum stay of 14-days - enough time for the initial radiation to fall to (relatively) safe levels. Remember to keep your family safe and stay in the fall out shelter until it is safe to come out!
How do you get fresh air to breathe in an underground bunker?
A good bunker will be mostly self-sufficient, consuming as little outside resources as possible. Filtering air from the exterior has obvious drawbacks such as needing to change those filters, as well as obstructions that prevent fresh air from entering your living space. There'll almost certainly be an intake vent and an exhaust vent required. Fresh air will enter the bunker and travel through to the living area, where it will mix with the existing air. The exhaust vent will then remove the stale air from the living area and deposit it outside.
You will also need an active pump to circulate the air throughout the bunker. This will ensure that everyone inside can breathe fresh air.
Another way to get fresh air is to grow plants inside the bunker. Plants produce oxygen as a by-product of photosynthesis, so they can help purify the air. Not all plants are suitable for this, however. It's best to choose plants that don't require a lot of sunlight or water.
We recommend using phytoplankton, more than half of the oxygen you breathe comes from marine photosynthesizers , like phytoplankton and seaweed. Both use carbon dioxide, water and energy from the sun to make food for themselves, releasing oxygen in the process.
You can also use an air purifier to clean the air in your bunker. An air purifier uses filters to remove harmful particles and gases from the air. This will help keep you healthy and safe during an emergency.
After that, you will need to make sure the vents are protected from routine annoyances like insects, rodents, weather and water. The last thing you want is for something to clog up the vents and prevent fresh air from getting in.
Finally, you will need to position the vents in such a way as to not draw in low-lying heavy vapors.
If you have a gas bunker, for example, you will want to make sure the exhaust vent is positioned high enough so that the gas doesn't escape.
Where are nuclear fallout shelters in the United States?
Most fall out shelters were built during the Cold War and were meant to protect people in the event of a nuclear attack. Today, many of these shelters are still standing, but they are not always easy to find. If you pay close enough attention you'll notice that most local banks are in fact nuclear fallout shelters.
Look for the symbol on the outside of the building:
Here are some tips on where to look for a fall out shelter:
Check with your local government. Some municipalities maintain a list of fall out shelters in their area. Here is a short list:
Check with your local historical society. Many fall out shelters have been converted into museums or other historical landmarks.
Sheltering in Place
Whether you are at home, work or anywhere else you frequent regularly, there may be situations when it's best to stay where you are and avoid any uncertainty outside. Here are some indicators and steps to take if the situation arises:
Use common sense and available information to assess the situation and determine if there is immediate danger.
If you see large amounts of debris in the air, or if local authorities say the air is badly contaminated you may want to take this kind of action.
Here are some tips for sheltering in place:
Local authorities may not immediately be able to provide information on what is happening and what you should do.
Watch TV and listen to the radio or check the Internet often for official news and instructions as they become available.
Bring your family and pets inside.
Lock doors, close windows, air vents and fireplace dampers.
Turn off fans, air conditioning and forced air heating systems.
Go into an interior room with few windows if possible.
Seal all windows, doors and air vents with thick plastic sheeting and duct tape. Consider measuring and cutting the sheeting in advance to save time.
Cut the plastic sheeting several inches wider than the openings and label each sheet.
Duct tape plastic at corners first and then tape down all edges.
Be prepared to improvise and use what you have on hand to seal gaps so that you create a barrier between yourself and any contamination.
“Sealing a room” is considered a temporary protective measure to create a barrier between you and potentially contaminated air outside. This type of sheltering in place requires pre-planning, by purchasing plastic sheeting and duct tape that you would keep in youremergency supply kit. https://www.ready.gov/nuclear-explosion
List of Caves in the United States to Survive a Nuclear Explosion
Your last option is to find a nearby cave system to bunker down in. I have included a list of all of the cave systems sorted by state. Go deep into the cave and make sure you have enough survival supplies to last you at least two weeks. Including a portable cooking stove and solar generator backpack to your supply stock is highly recommended.
I hope you found it informative and helpful. Remember, if nuclear war does happen, the most important thing is to stay safe and shelter in place until it's over. With these tips, you'll be prepared for anything! Thanks for reading!